Sonntag, 14. November 2010

How to use custom form templates in NewForm.aspx/EditForm.aspx


A main criterion that distinguishes websites between good and bad usability is the way, how users can enter data to forms. 

Imagine a list with around 15 or more fields. Now a user creates an initial item for that he only enters a few metadata to the item like title, description and a date. After that, another user modifies that item and adds some other field-values. And at last but not least, a third user completes the form by entering all missing values. So you want to show specific fields related to users or roles. Wrap that by a workflow with email-notifications if you want but that’s not the topic of my post. 

By default, you have a newform.aspx/editform.aspx that displays all those 15 fields which is not quite necessary for the first user. The second user should not see those metadata-fields the first user entered during initial creation and the last user fills the last values.

Finally you really want to impress your customer so the fields in the form are grouped by context in a multi-columned table and have some stylish images around.

So how would you do that without creating your own applicationpage with onClick-eventhandling on the submit-button and managing saving all the field-values to the item by your own?

“Use custom form templates!” is the answer.

So how do we do that?

At first, it’s important to know that the default-template that’s displayed if you enter the NewForm.aspx or the EditForm.aspx is called ListForm and can be found in 14-Hive\TEMPLATE\CONTROLTEMPLATES\DefaultTemplates.ascx.

In that RenderingTemplate the typical design you know from the xxxForm.aspx is rendered here. Pay attention to the WebControl which renders all visible fields from the list by iterating them. MSDN says you can inherit from the ListFieldIterator and create your own FieldIterator-Class. We don’t want that. We write our own RenderingTemplate.

For this experiment, I created a new Blank Site Collection with english language where I set my upcoming project to. Create a new Empty SharePoint Project in your Visual Studio 2010 and set its destionation Site Url to the just created Site Collection. Now add an item Content Type to your project and set Item as base content type. Now add an item Empty Element named “fields” to that content type.

This is our project structure so far
In its Elements.xml we add some fields that we want to use in our list later:
 
<Elements xmlns="http://schemas.microsoft.com/sharepoint/">
  <Field ID="{42DEFD29-4A11-4fd7-958A-137049381E53}"
         Name="TestTextfeld"
         StaticName="TestTextfeld"
         DisplayName="TestTextfeld"
         Type="Text"/>
  <Field ID="{3B6982AF-7B93-4b3c-95BB-3D90E03E30EC}"
         Name="TestDatetime"
         StaticName="TestDatetime"
         DisplayName="TestDatetime"
         Format="DateOnly"
         Type="MyDateTimeField"/>
  <Field ID="{B3C1A58F-9583-410d-BA4B-5545E37565F1}"
         Name="TestBoolean"
         StaticName="TestBoolean"
         DisplayName="TestBoolean"         
         Type="Boolean"/>
  <Field ID="{273D7F41-BB9D-4537-AF66-477A0FA09CC9}"
         Name="TestChoice"
         StaticName="TestChoice"
         DisplayName="TestChoice"
         Type="Choice">
    <CHOICES>
      <CHOICE>1</CHOICE>
      <CHOICE>2</CHOICE>
      <CHOICE>3</CHOICE>
    </CHOICES>
  </Field>
  <Field ID="{EB57DC41-A510-442a-83DE-09D01462914E}"
         Name="TestUserField"
         StaticName="TestUserField"
         DisplayName="TestUserField"
         Type="User"/>
</Elements>
After that, reference those fields in your ContentType. Your Elements.xml now should look like this:

<Elements xmlns="http://schemas.microsoft.com/sharepoint/">
  <!-- Parent ContentType: Item (0x01) -->
  <ContentType ID="0x01000db7705609a14adeacf933a7ce690bb8"
               Name="SharePointProject1 - ContentType1"
               Group="Custom Content Types"
               Description="My Content Type"
               Inherits="FALSE"
               Version="0">
    <FieldRefs>
      <FieldRef ID="{42DEFD29-4A11-4fd7-958A-137049381E53}" Name="TestTextfeld"/>
      <FieldRef ID="{3B6982AF-7B93-4b3c-95BB-3D90E03E30EC}" Name="TestDatetime"/>
      <FieldRef ID="{B3C1A58F-9583-410d-BA4B-5545E37565F1}" Name="TestBoolean"/>
      <FieldRef ID="{273D7F41-BB9D-4537-AF66-477A0FA09CC9}" Name="TestChoice"/>
      <FieldRef ID="{EB57DC41-A510-442a-83DE-09D01462914E}" Name="TestUserField"/>
    </FieldRefs>  
  </ContentType>
</Elements>

Now comes the cool part: after the closing </FieldRef>-Tag add this xml-snippet:

<XmlDocuments>
      <XmlDocument NamespaceURI="http://schemas.microsoft.com/sharepoint/v3/contenttype/forms">
        <FormTemplates  xmlns="http://schemas.microsoft.com/sharepoint/v3/contenttype/forms">
          <Display>ListForm</Display>
          <Edit>CType1CustomForm</Edit>
          <New>CType1CustomForm</New>
        </FormTemplates>
      </XmlDocument>
    </XmlDocuments>

CType1CustomForm is the new RenderingTemplate we want to use for edit and new. Display we do ignore for the moment; show the item in the default way by ListForm. It’s important to set the Inherits-Attribute to FALSE or the custom form templates are ignored, no matter, what you enter here. If you need to inherit from another content type, you also can set the formTemplates by code, for e.g. in a Feature Receiver:
SPContentType ctype = spWeb.ContentTypes[new SPContentTypeId("0x01000db7705609a14adeacf933a7ce690bb8")];

ctype.NewFormTemplateName = "CType1CustomForm";
ctype.EditFormTemplateName = "CType1CustomForm";

ctype.Update(true);

Pay attention that the approach of setting custom templates to each content types makes it possible to individualize the form for every content type in your list. No more inappropriate fields. :-)

So now it’s time to create the Template. Add a new SharePoint Mapped Folder and set it to {SharePointRoot}\TEMPLATE\CONTROLTEMPLATES.
Add a new User Control to this folder and remove its .cs-Files.  In my example, I named it CType1CustomForm.ascx. From the SharePoint DefaultTemplate.ascx (found in 14-Hive\TEMPLATE\CONTROLTEMPLATES) I copied that Part beginning with <SharePoint:RenderingTemplate id="ListForm" runat="server"> and ending with </SharePoint:RenderingTemplate>  into the new user control.

To proof, that now this Template is used by our content type, I added the Term “CType1CustomForm” after the  <span id='part1'>-Tag which is displayed first in the dialog’s contentarea.

Add a list definition of type custom with list instance to your VS2010 project. Add a contenttype-reference and copy the field-elements to the schema.xml. If you want, you can add some demo-data to the data-section of the listinstance like this:

 <ListInstance Title="SharePointProject1 - ListInstance1"
                  OnQuickLaunch="TRUE"
                  TemplateType="10000"
                  Url="Lists/SharePointProject1-ListInstance1"               
                  Description="My List Instance">
    <Data>
      <Rows>
        <Row>
          <Field Name="TestTextfeld">Text im Textfeld</Field>
          <Field Name="TestDatetime">2010-10-28T11:00:00Z</Field>
        </Row>
      </Rows>
    </Data>
  </ListInstance>


If you want, you can test the progress so far by pressing F5 and click “Add new item” in the list. You should see something like this:


Okay, the half of the job is done. Now we want to rearrange the lame display of the fields.
For that purpose, add another User Control to the mapped CONTROLTEMPLATES-folder but this time leave all the automatically created Code-Behind-Files. In my case, I named it MyCustomForm.ascx.

By default the <sharepoint:listfielditerator>  displays all contenttype-fields, that may be displayed in this form and that are not yet added to the form.  So we include our own User Control right before the <SharePoint:ListFieldIterator> -Tag in the CType1CustomForm.ascx:

<SharePoint:FolderFormFields ID="FolderFormFields1" runat="server"/>

<!-- myCustomForm -->
<myCustomForm:AddForm runat="server" />
<!-- myCustomForm -->

<SharePoint:ListFieldIterator ID="ListFieldIterator1" runat="server"/>

Don’t forget to register the tag in the directives-area:
<%@ Register TagPrefix="myCustomForm" TagName="AddForm" src="~/_controltemplates/MyCustomForm.ascx" %> 
All the fields, which are added in MyCustomForm.ascx will not be rendered by the ListFieldIterator again. But if your customer adds new fields to the list after you installed the solution, those new fields are rendered fine like the default-forms below your customizations.

Now let’s come to the MyCustomForm.ascx.

In this User template, I created a HTML-Table where I placed all the SharePoint-WebControls to render the fields, for e.g:


<table width="700px">
    <tr>
        <td>
            <asp:Label ID="Label5" runat="server" Text="Title" />
        </td>
        <td>
            <SharePoint:TextField ID="Title" runat="server" FieldName="Title" />
        </td>
        <td>           
        </td>
        <td>
            <asp:Panel ID="bild" runat="server"></asp:Panel>
        </td>
    </tr>
    <tr> 
        <td>
            <asp:Label ID="Label1" runat="server" Text="Textfeld" />
        </td>
        <td>
            <SharePoint:TextField ID="TextField1" runat="server" FieldName="TestTextfeld" />
        </td>         
        <td>
            <asp:Label ID="Label2" runat="server" Text="Datetime" />
        </td>
        <td>           
            <SharePoint:DateTimeField ID="DateTimeField1" runat="server" FieldName="TestDatetime" />          
        </td>
    </tr>
    <tr> 
        <td>
            <asp:Label ID="Label6" runat="server" Text="Userfeld" />
        </td>
        <td>
            <SharePoint:UserField ID="UserField" runat="server" FieldName="TestUserField" />
        </td>
        <td></td>                
        <td></td>
    </tr>
    <tr>
        <td>
            <asp:Label ID="Label3" runat="server" Text="Boolean"/>
        </td>
        <td>
            <SharePoint:BooleanField runat="server" FieldName="TestBoolean" ID="booleanField" /> (Check this box to see more settings)
        </td>
        <asp:TableCell ID="choiceLabel" runat="server">
            <asp:Label ID="Label4" runat="server" Text="Choice"/>
        </asp:TableCell>
        <asp:TableCell ID="choiceField" runat="server">
            <SharePoint:RadioButtonChoiceField ID="RadioButtonChoiceField1" runat="server" FieldName="TestChoice" />
        </asp:TableCell>
    </tr>              
</table>

As you can see, it’s quite simple to add the field controls. It’s important, to set the correct FieldName. If the FieldName-Values doesn’t match the internal fieldnames, SharePoint can’t map them and displays the control by the ListFieldIterator instead of your code.

You can also use your own custom fields here. To demonstrate, I created a new custom field by inheriting from the default DateTime-field to show the user an error-message, if the entered date is lower than the current date. Because my custom field inherits from SPFieldDateTime, I can display it by using 
<SharePoint:DateTimeField ID="DateTimeField1" runat="server" FieldName="TestDatetime" />
In the wired CodeBehind I added some functionality to toggle the visibility of the radiobuttons-field depending on the checkbox-state. Don’t be worried, to provide you a sum of all the written above, I attach the sourcecode for download below.

Following a picture of the final result:


As you can see, the content of the NewForm/EditForm is completely different from the default-style. As I described earlier, the ListFieldIterator adds new not referenced fields below until you update the user control:


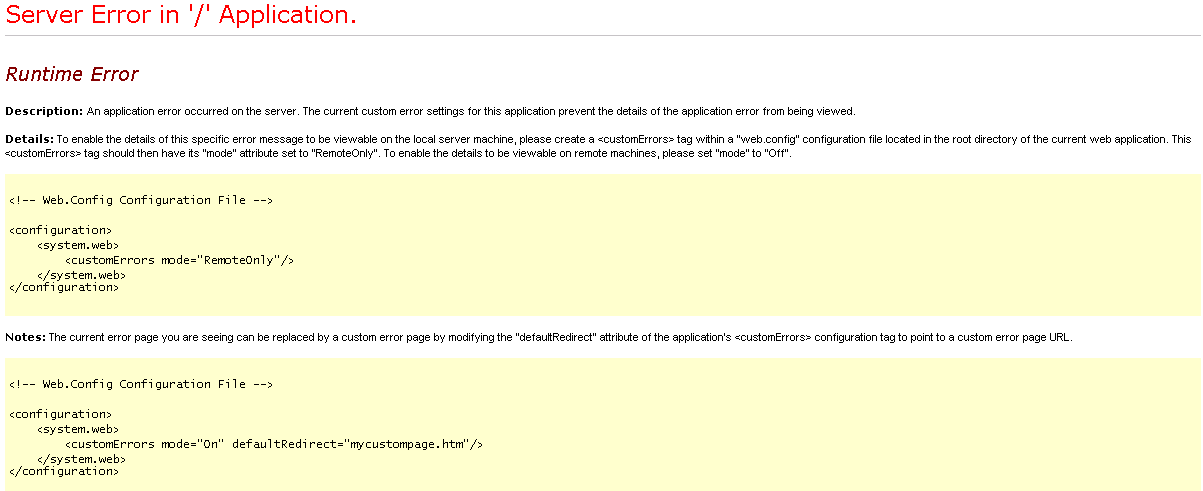
Hint: If you get an exception during F5-debugging when you entered an invalid date, like you can see on the following screen, just ignore it by hitting the run-button. It seems like this way (throwing an exception on field-validation) is the Microsoft-preferred way to handle invalid field-values:


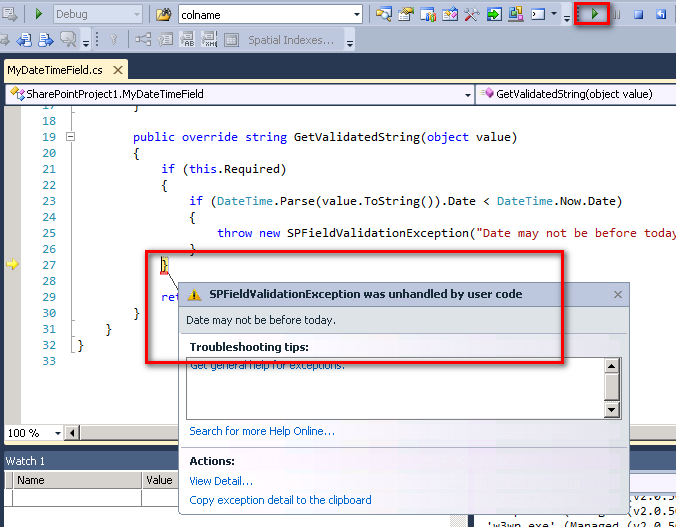
The exception-message is the red-displayed error-message below the validated field.

The complete Visual Studio-Project can be downloaded from codeplex (my first codeplex-project, yehaa!): http://customformtemplates.codeplex.com
I hope, you’ll find this design-possibility as much as useful and exciting as I did when I discovered it.

Happy coding!

Donnerstag, 11. November 2010

ExcelServices "You do not have permissions to open this file."

Today I spent hours to solve a problem most annoying. I walked through Microsoft's tutorial you can find here how to use SharePoint 2010 Excel Services to open an Excelsheet uploaded to a SharePoint-Library.

I implemented the not really complex example with the result... that nothing worked like expected. Always when the debugger was in the line of sessionId = es.OpenWorkbook(...), I've got an exception with the nothing-telling message "You do not have permissions to open this file.".

So I searched for solutions and hints at Google but all those tips there (change Excel Service Application-Settings, modify Trusted Locations, etc.) didn't work.

At last I tried something, I had in mind all the time but somehow it was too obvious that it wouldn't be the solution for my problem. And ha! As I tried anyway just for fun, it suddenly worked.
All I did, was to change the Location Type for my library in which the excel was uploaded to "HTTP". All the time before it didn't worked, this setting for here was "Microsoft SharePoint Foundation".


Freitag, 10. September 2010

Short tip: missing BaseType in ListTemplate...

...leads to an error-message like this:

GetUserListSchema(): Failed to initialize list properties from the list schema XML for feature '{287a98fc-9404-488d-90ae-b1a67d309cca}', template '10009': hr=0x80004005.    c6487200-188d-4f97-a104-731949084550
09/10/2010 11:17:03.41     w3wp.exe (0x0D74)                           0x0264    SharePoint Foundation             General                           8l2r    High        Failed to find the list schema for FeatureId '{287a98fc-9404-488d-90ae-b1a67d309cca}', list template ID 10009.  Cannot create list in web "..." at URL "(null)".    c6487200-188d-4f97-a104-731949084550

So before checking folder-structure in 14-Hive or analysing your VS2010-Package structure for the assumed missing schema.xml first check your ListTemplate for an existing BaseType="0"-entry.

Donnerstag, 27. Mai 2010

The template you have chosen is invalid or cannot be found


Today I solved another sharepointastic riddle. As you maybe know, it's possible to assemble a web with all lists, content and what else you need, and save it as Site Template for reuse. After that you can create new sites by gui or on programmatical way.
But be careful! If you created the .stp-File on a MOSS 2007 with Enterprise-licence, you may see this nice error-message when you try to create a site on a MOSS 2007 without Enterprise-licence (Standard-licence only):


"The template you have chosen is invalud or cannot be found". Jippiejajee Schweinebacke!
The first location I visited was the SharePoint-Logs. Very often I don't find any clues for problems but this time - oh wonder - I did:

Applying template "Deployment.stp" to web at URL "http://server/sites/test/deployment".        
05/27/2010 14:07:51.87         w3wp.exe (0x06D4)                               0x0A14        Windows SharePoint Services           Fields                                88ys        Medium          Failed to get the site template for language 1033, search key 'Deployment.stp'. This warning is expected when provisioning from a custom web template.        
05/27/2010 14:07:53.57         w3wp.exe (0x06D4)                               0x0A14        Windows SharePoint Services           Fields                                936z        Medium          Marking web-scoped features active from manifest at URL "http://server/sites/test/deployment"        
05/27/2010 14:07:54.41         w3wp.exe (0x06D4)                               0x0A14        Windows SharePoint Services           General                               936x        High            Failed to mark site-scoped features active in site 'http://server/sites/test/deployment'.        
05/27/2010 14:07:54.44         w3wp.exe (0x06D4)                               0x0A14        Windows SharePoint Services           General                               72h9        High            Failed to apply template "Deployment.stp" to web at URL "http://server/sites/test/deployment".        
05/27/2010 14:07:54.44         w3wp.exe (0x06D4)                               0x0A14        Windows SharePoint Services           General                               72k2        High            Failed to apply template "Deployment.stp" to web at URL "http://server/sites/test/deployment", error The template you have chosen is invalid or cannot be found. 0x81071e44        
05/27/2010 14:07:54.44         w3wp.exe (0x06D4)                               0x0A14        Windows SharePoint Services           General                               8kh7        High            The template you have chosen is invalid or cannot be found.

Alright, this approved my assumption an Enterprise-feature that's not available in Standard-licence is making trouble here.
So I activated google for a page that lists the differences between Enterprise- and Standard-Features and after a while I found a helpful blogpost in the msdn:


Office SharePoint Server Enterprise Site features

Internal Feature Name:  PremiumWeb
Feature Id:  0806D127-06E6-447a-980E-2E90B03101B8
Feature Definition Id
Feature Display Name
E8734BB6-BE8E-48A1-B036-5A40FF0B8A81
RelatedLinksScopeSettingsLink
56DD7FE7-A155-4283-B5E6-6147560601EE
AnalyticsLinks
0BE49FE9-9BC9-409d-ABF9-702753BD878D
SlideLibrary
065C78BE-5231-477e-A972-14177CC5B3C7
BizAppsListTemplates (KPI List)
2510D73F-7109-4ccc-8A1C-314894DEEB3A
ReportListTemplate
00BFEA71-DBD7-4F72-B8CB-DA7AC0440130
DataConnectionLibrary

These are the features on Web-Scope that aren't available on the Standard-licenced server. The blog-post also lists Enterprise-features on SiteCollection - and WebApplication-Scope.

Now I had to look into the .stp-File. To do so, I renamed the deployment.stp to deployment.cab and extracted it into c:\temp\deployment.
I opened the manifest.xml, searched for each of the feature definition ids and removed the whole -tags. Now the tricky part came: how to get back all extracted files to a .stp without writing a .ddf-file?

Forget about MAKECAB.EXE, use CABARC.EXE! It's a tool in Microsofts Cabinet Software Development Kit; you can download it here: http://support.microsoft.com/kb/310618

The webpage on http://www3.hi.is/~snorri/SDK-docs/tools/tools008.htm lists a lot examples of how to use cabarc. So I copied CABARC.EXE into c:\temp and used this command to create my new deployment.stp-file:

c:\temp\cabarc n deployment.stp deployment\*.*

Now I have a new working .stp-file I can use as SiteTemplate to create sites on a MOSS 2007 with Standard-licence.

Dienstag, 4. Mai 2010

Central administration 2010: Solution store, where did you go?

With no applications- or operations-tab no more, SharePoint's Central Administration looks a little more cleaned up... and messy too. Where the heck did the solutions store from Operations > Solution Management go to? In CA 2010 you'll find it in System Settings > Manage farm solutions or Manage user solutions (for sandboxed solutions):

Alternatively you can get a list of installed farm solutions by using the SharePoint Management Shell Commandlet Get-SPSolution or for user solutions by Get-SPUserSolution.

Mittwoch, 28. April 2010

Field type xxx is not installed properly. Go to the list settings page to delete this field.

A little reminder for myself (and all the other custom -field-developers) how the notation of the value for the FieldTypeClass-attribute in the fldtypes_xxx.xml has to be to prevent the nasty error message like this posting is titled:

<field name="FieldTypeClass">namespace.fieldclassname, assembly name, Version=versionnumber, Culture=culture, PublicKeyToken=publickeytoken</field>

Montag, 19. April 2010

"No FormURN for this page"-Error after importing reusable workflow from SPD in VS

Since this morning I am experimenting again with the new workflows in SharePoint 2010. This time I tried to import a workflow I created with SharePoint Designer 2010 and afterwards import it in Visual Studio 2010 to extend its functionality. This MSDN Tutorial seemed to fit my requirement.

But after finishing the last step and the try to start the workflow, I got the errormessage "The workflow template has specified no FormURN for this page.". Hm, I thought, I forgot some step or misconfigured something but I did all well. Spent some time googling and finally found this blogpost.

It says, I should remove all the ...URL-Attributes from the Workflow-Tag in my Elements.xml. So I did and removed InstantiationUrl="_layouts/IniWrkflIP.aspx" and 'et Voila', the result was like the MSDN-tutorial promised.

But I still don't have any clue why the workflow designed and directly published from SPD does work but after importing and publishing from VS does not before I do the descriped modifications.

Any ideas and comments are welcome... :-)

Montag, 12. April 2010

Custom errors in SharePoint 2010

The previously announced postings about creating custom picker-fields are still on hold on my site, I'm deeply sorry for that. Currently I'm familiarize oneself with SharePoint 2010 and there's less time for writing large articles like the promised but it will come, I swear! ;-)

Instead of that, here comes a little hint I found while playing around with the 2010 beta. You all know how to enhance the error-logging by setting customError mode to "Off". I did this in web.config in inetpub-directory but the page still throws such an error-message:


After a little googling, I found the hint, that there's another (new) location for the web.config in C:\Program Files\Common Files\Microsoft Shared\Web Server Extensions\14\TEMPLATE\LAYOUTS.
There you have to set customErrors mode to "Off" as you know it and everything works fine again.


Donnerstag, 25. Februar 2010

Changing the button-images on EntityEditorWithPicker for a custom Picker-Field

If you ever got the task to create a custom field with custom pickerdialog-controls, don't dispair. Although there is no really helpful tutorial or how-to that illuminates the connections between field-, control-, entityeditorwithpicker-, dialogclasses and so on available on the internet (at least I never found one) and the information available on msdn is sparely too. My approach so far was to reflector all the stuff, Microsoft did in their picker-classes and I found out, that they did a lot of unbeautiful things in their classes that makes it harder to inherit from them.

As long as you just want to change the searchquery or the result-list (to achieve a behaviour similar as you know from the peopleeditor) this is no big hit. But as soon, as you start to create more individual pickerdialogs, you will run in some difficulties.

My plan for the next time is to write a few articles and how-tos about how to create custom picker-fields with more cool look and feel than known from the people-editor.

Let's start with a "simple" task. You know the two button below the entityeditor-field for checking names and browse:


Now it's the task to replace those two buttons by your own to have a closer look to the whole surrounding website-design like this one:


The locations for those two images can be set in the EntityEditorWithPicker-class and are stored in the members named CheckButtonImageName and BrowseButtonImageName. If you have a look in the msdn for that member, you'll see... absolutely nothing helpful. Even if you enter them as searchterm in google, you'll find at most one page. So I had to guess and did try-by-error-changes.

The result, you can see on the second screenshot, I achieved by setting those values to the members in the onInit-method of my inherited EntityEditorWithPicker-class:

CheckButtonImageName = "../../_layouts/_myproject/images/icon/check_a.gif";
BrowseButtonImageName = "../../_layouts/_myproject/images/icon/book.gif";


The path to the images is assembled by going to the 12\template-folder upward from the subfolder in the controltemplates-folder, where the controltemplate (that includes the entityeditor-tag) exists and after this going down to the icons in the layouts\images-folder. The following image helps you to understand this:


Mittwoch, 10. Februar 2010

How to get absolute path to a sp-object on the simple way

Often I have to work with absolute urls instead of the server-relative that I can get from SharePoint-Objects like for e.g. SPContext.Current.ListItem.Url that returns me something like "Pages/subfolder1/publishingpage1.aspx".

Until now I cumbersome concatenated the different url-parts to get the absolute path but I found a much more simple method that relieves that task: just use the MakeFullUrl-Method of your SPSite-Object. Simple reference the server-relative URL as parameter and get the full path.

// for e.g.: returns http://server/sitecollection/Pages/folder/publishingpage.aspx if executed in the code-behind of a PublishingPage
string absoluteUrl = SPContext.Current.Site.MakeFullUrl(SPContext.Current.ListItem.Url);

Dienstag, 2. Februar 2010

Redirect to a PublishingPage in edit-mode from code-behind

After a long period of not-posting because of high stress at the current project at work, finally I found some time to write a little hint. I really hope to shorten the period of time between future posts. I promise, that I'll try! :-)

In the current project it's a requirement to create PublishingPages on a code-behind of an application page and redirect to that Page afterwards.

There're two little stumbling blocks you have to watch out. The first is, that you have to check out the newly created PublishingPage before redirecting, otherwise you'll get a nice error-message of type "You have not checked out this page. Click 'Edit Page' to edit the page.".

The next obstacle is - you wouldn't believe it -  the correct use of case-sensitive parameters in the querystring. So much to say for case-insensitiveness of querystring-parameters.

Use this code-snippet to redirect to a PublishingPage:

PublishingPage newPage = <Method that creates thePublishingPage>();
...
newPage.CheckOut();

string controlMode = "Edit";
string displayMode = "Design";

Page.Response.Redirect(string.Format("{0}?ControlMode={1}&DisplayMode={2}", newPage.Uri.AbsoluteUri, controlMode, displayMode), true);


Be sure to write "Edit" and "Design" with capitalized letters or else it wouldn't work.